C# Delegates

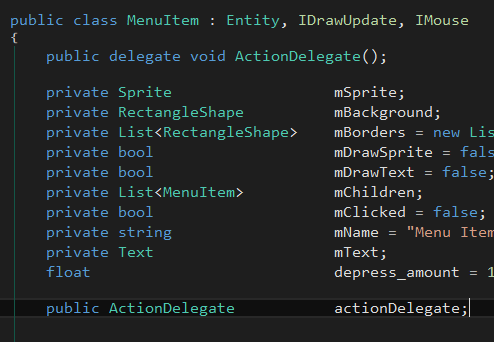
Delegates provide a way of implementing callbacks much like function pointers in C/C++.
Simply create the delegate’s signature and (if you like) add it as a member to a class you wish to have a callback.

.

Create a static function in which to refer to and then assign the static function to the delegate like so:

.

Just make sure the signatures match (ie void, int , etc.)

Godot Engine - Collisions

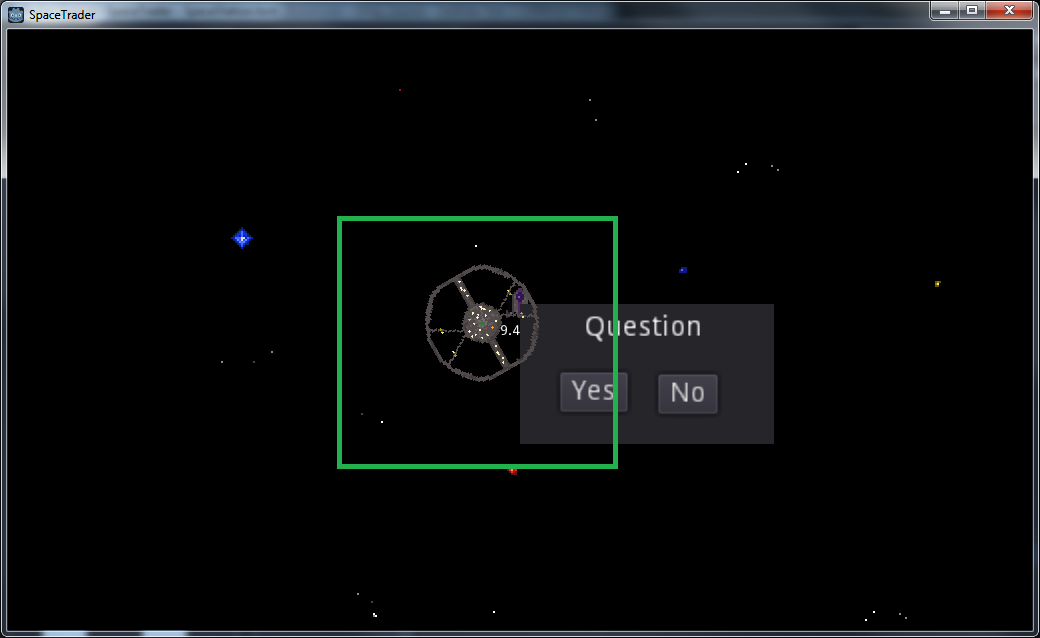
Godot has a really great collision system. Its flexible and variable in detail. For my space trader game, I wanted to detect whether the player had entered a predefined area to show a menu for docking. When leaving the area, the popup will then close.

Player has entered area and is now being shown a popup

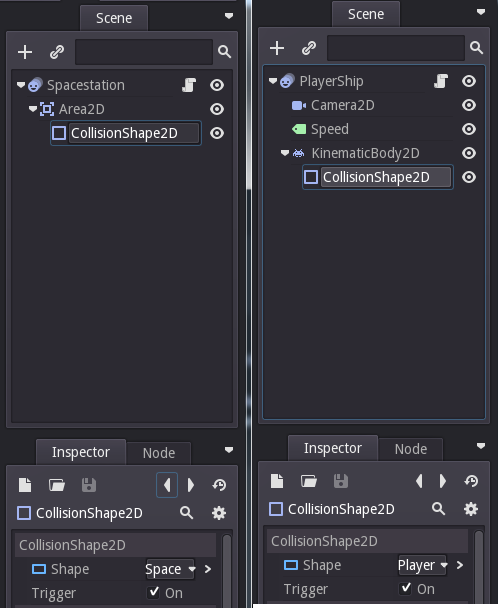
The space station owns the detection area and the player has a kinematic body. The implementation goes as follows:

  1. Add an Area2D node to the space station.
  2. Attach a CollisionShape2D to the Area2D
  3. Choose a shape and ensure the “Trigger” is on. Area2Ds can’t detect collision without a CollisionShape2D
  4. In the Player Attach a KinematicBody2D and like the Area2D node, a CollisionShape2D to that.
Shows the nodes and required properties.

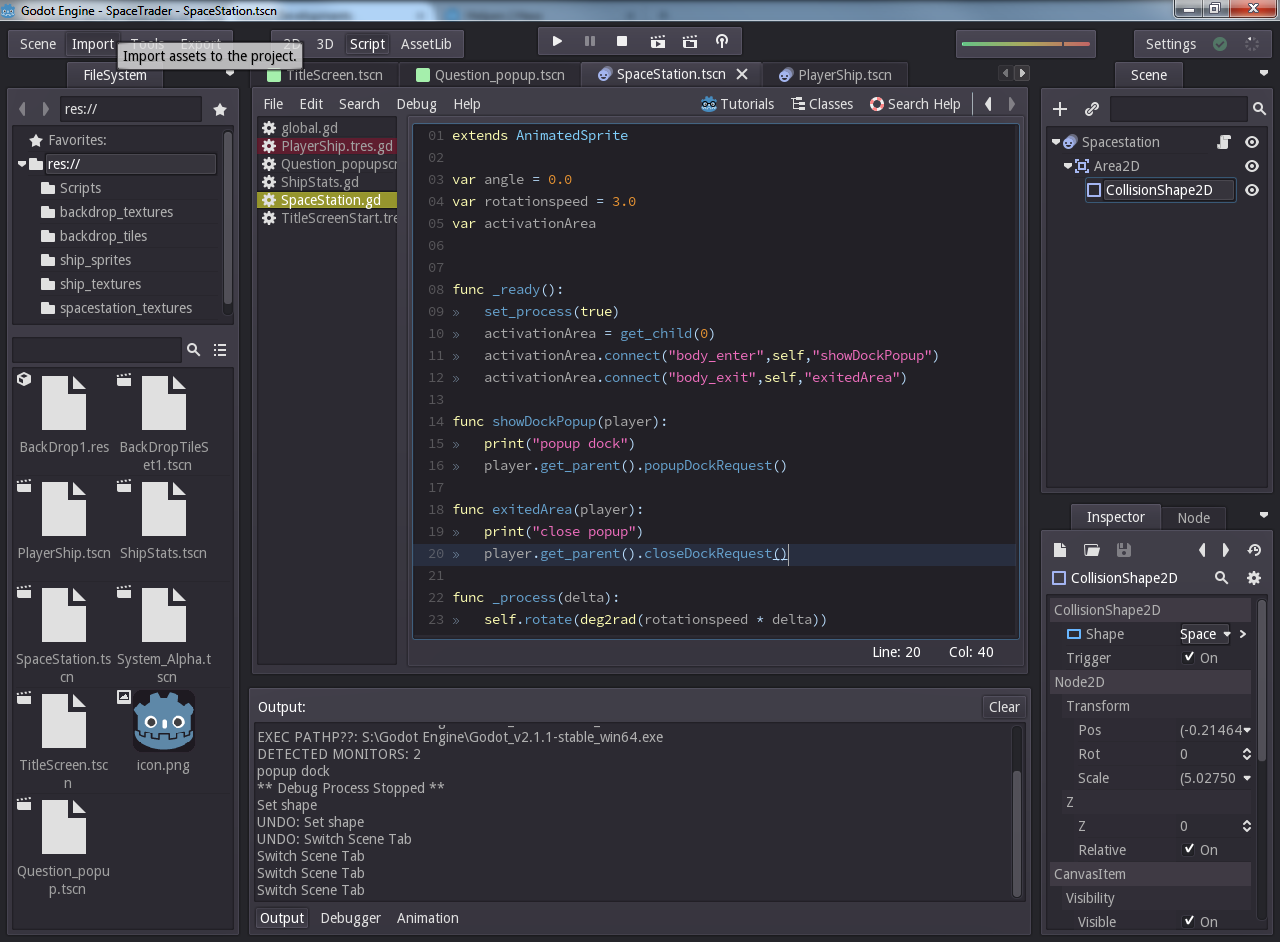
Now we can use these nodes to detect when the player enters the activatable area of the space station. In order to utilize that we must setup and capture the signals emitted by the Area2D on the space station.

Script to connect enter and ext signals.

The syntax of a signal is: signal_name(var parameter_passed_with_signal). The signals emitted by a node are viewable from the “Node” tab, next to the “Inspector” tab.

In order to receive a signal, it needs to be connected to a function that takes the same parameters that the signal passes (signals can also have no parameters). The above image shows that the “body_enter” signal from the spacestation’s Area2D node, is going to be connected to the spacestation node’s (itself) showDockPopup(player) function (line 11).
That is all there is to it. The connected functions will be triggered by the signals. In this case, they will show and close the docking-request popup.

Godot Engine - Scenes and Nodes

So a few days ago I started using Godot Engine (available here). I had been looking at various engines to speed up development on personal projects. Having tried Unity and not fully gotten on board with it, I wanted to see what else was about.

Prototyping ideas, and doing so quickly, is really important. Having many unfinished projects in C++, Java, C# etc I realised that those routes are fine. I love programming, but there’s nothing worse than getting to a playable point and realising the idea is no fun. I had a play around with Clickteam Fusion and is great for the job, but still frustrates me that I can’t just type/program what I want it to do.

I’d heard great things about Godot and the only thing making me hesitate was the use of their own scripting language – GDScript. Its a Python-line language…I simply thought “yuck”. But, three days into it I am absolutely loving it.

This blog was created to document my learning and discoveries of Godot Engine. I love it and sometimes its great to have your own resources for reference.

Scenes and Nodes – Not a scene like in a film or Unity but, it can be. The documentation is great for Godot and it does a very good job of educating users to its architecture. Nodes are the base object/class of everything. Nodes can be children or parents of other nodes. A scene is required to have one root-node. A scene can also be viewed as a node in some respects, as you can parent a scene to another scene as an instance. Essentially, Godot engine gives great flexibility in letting the developer choose how to best organise these scenes and nodes. (reference here)

Monogame - Billboarding

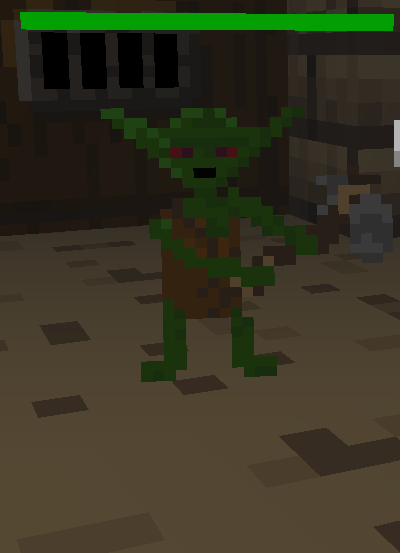
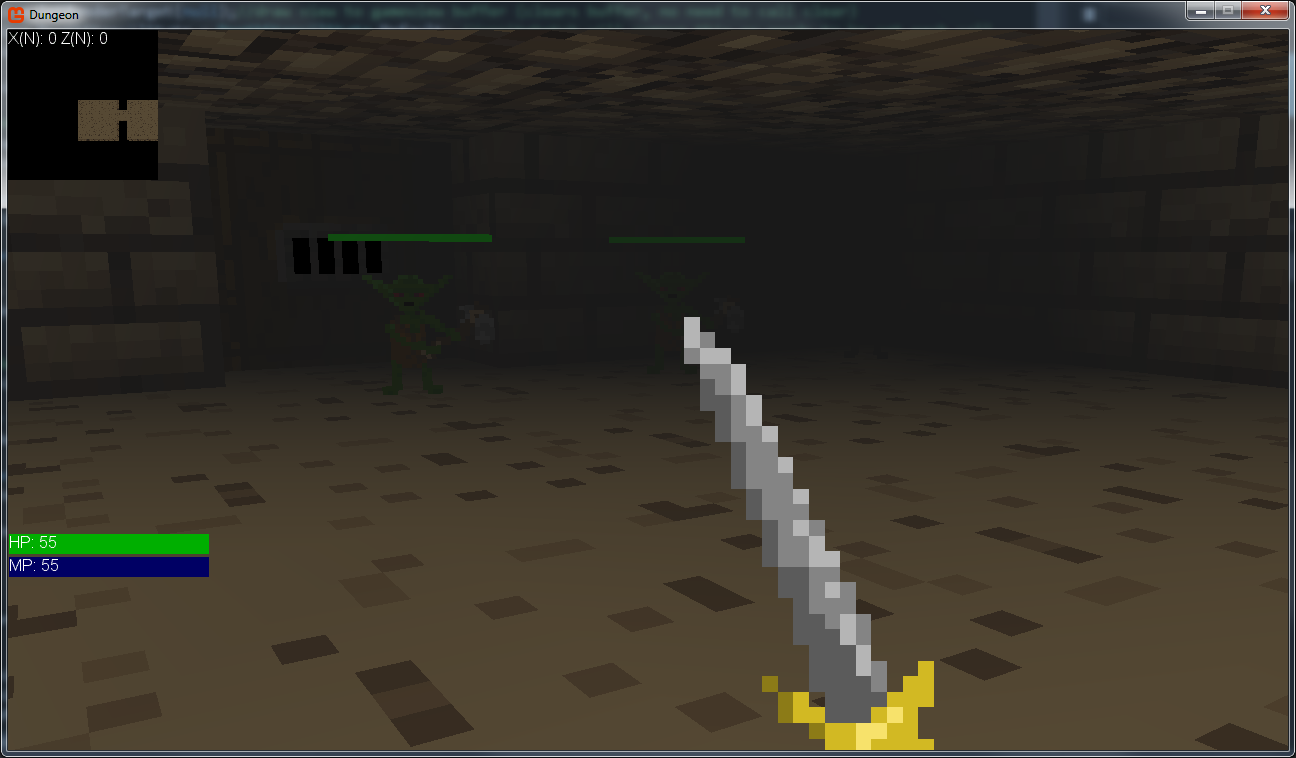
This is an incredibly easy thing to do using Monogame. As an example of what is meant by billboarding, check the image below:

.

The scene is in full 3D but instead of using 3D models, I opted for Sprites that always face the camera/player. Used in old 3D games such as Wolfenstein it is nothing new. It is not solely what this is used for either. In larger 3D games, billboards can be used as substitutes for 3D models on objects that are far away. Scenes with large rolling hills and forests upon them for an example. A tree can be a billboard beyond a certain distance.

Monogame provides a static function for creating a billboard matrix. Simply substitute your typical 3D world/model matrix for the billboard matrix and you have your 2D sprite in a 3D world.

.

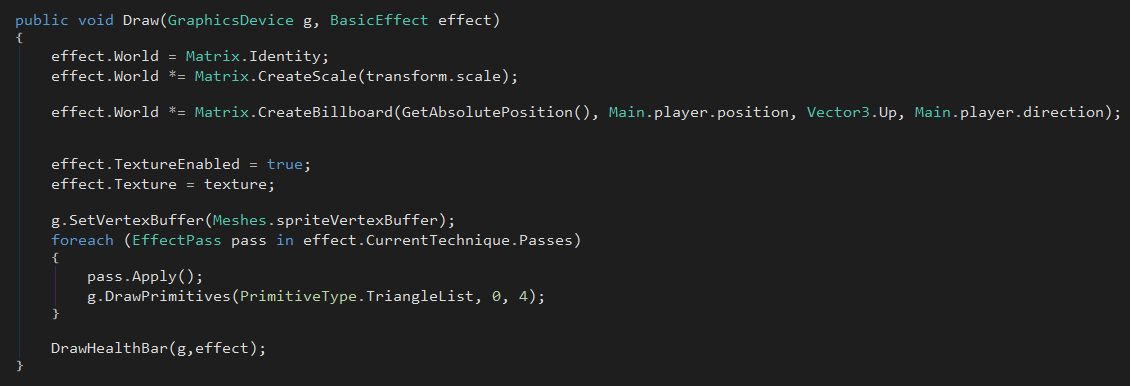
The above image shows the function used to draw the goblin in the previous image. The rotation matrix is omitted and where you would use the usual 3D model matrix, use Matrix.CreateBillboard(ObjectPosition, PositionOfViewer/Camera,UpVector, DirectionOfViewer/Camera).

Monogame - Simple 2D Collision

My dungeon crawler game, like any other needed collision detection for many aspects of the gameplay. Hit detection, walls, activating doors etc. Even though it is in 3D, due to it being a prototype I kept it simple in the 2D world. Having said that I didn’t, realise how easy it was as I was rolling my own before checking out how Monogame does it. Here we go.

1.Add a BoundingBox as a member to whichever class, component, entity etc. you wish to have collision detection.

.

I chose the constructor that took two points as parameters, ‘min’ and ‘max’. It is really important, and probably obvious, but the ‘min’ value MUST be less than the max. You may think ‘duh’ but if you rotate the BoundingBox, the min value may not be the minimum anymore, so just watch out for that.

2.Create a function for checking if something has hit something else. There are a multitude of collision functions on bounding box. Intersecting, rays, overlapping and points. I chose to use a point for basic door collision. This point is calculated by using the same calculation for moving. Workout the new position, pass it to this method. If it returns true, move else don’t.

.

The above image shows one of my collision functions. It also doubles for activation, which is what the “isCollisionCheck” parameter is used for. That can be ignored for this example.

To utilize the BoundingBox functions simply compare the return of the ‘Contains()’ method with the Monogame enum ‘ContainmentType’. There are a few, but here ‘Intersects’ was chosen.
Monogame - First-person Camera mouse-look

So the other post on fps cameras covered how to do the rotations of the view. This post covers handling the mouse input to move the fps camera.

The methodolgy for the mouse-look is much like the keyboard input post. The difference being that instead of storing the last state, you store an original state of the mouse. I.e. a position which is used to compare to the current mouse position.

The first person camera rotation has to be reactive to the amount moved by the player. Ie, they move the mouse a little bit, the camera moves a little etc. Its no good having it rotate at a constant rate.

  1. Set the mouse pointer to the center of the screen and store this as the originalState of the mouse. I did this in my Initialize function.
.
  1. Then where player input is checked, like with the keyboard, we store the new, current state of the mouse. Once stored, check if the state has changed, if it has calculate the difference between the mouse positions and rotate the camera by that amount on the relevent axis
.
  1. Finally, reset the mouse back to its original position at the end of the function where input is checked.
.

Monogame - Keyboard Input On-Release

Monogame doesn’t provide an onRelease type function for the keyboard input. What this means is that pressing a key to receive one, single input can be a pain.

For example, in my dungeon crawler game, if opening a door I don’t want to have it activate more than once as the activate toggles. So if the door is closed, it will open and vice versa. If you don’t limit the activation to a single instance (like once a key has been released) it becomes luck as to whether the door stays open on activation.

Monogame provides states for its various inputs. By storing the old state of the keyboard you can check if the key was pressed and now released.

1.At the top of the function you take input, store the new state to a local KeyboardState variable

.
  1. Create a class member to store the old state and at the end of the function, store the current new state to the old state.
.
  1. Then where you check which key is pressed (between the new and old state), compare the new state to the old state
.

And there you have an onReleaseKey type function. It checks if the key was pressed last run and if the key is now up. This stops you having multiple, unintended actions happening.

Monogame - Simple First-person Camera

Full disclaimer: This is not how anyone should be using quaternions. The dungeon-crawler game is simply a learning/prototype project and I needed to get this working. This is just a means of using a basic understanding of how to manipulate quaternions to do what was needed.

Quaternions…I kind of understand them but not really. I understand them enough to achieve what I want done. Eventually after studying them I’ll get it I’m sure but for now I’ll continue in ignorance.

.

A simple fps cam is suprisingly involved. Originally for simplicity this game did not use mouse-look but when I realised that it was worth the effort I implemented it.

.

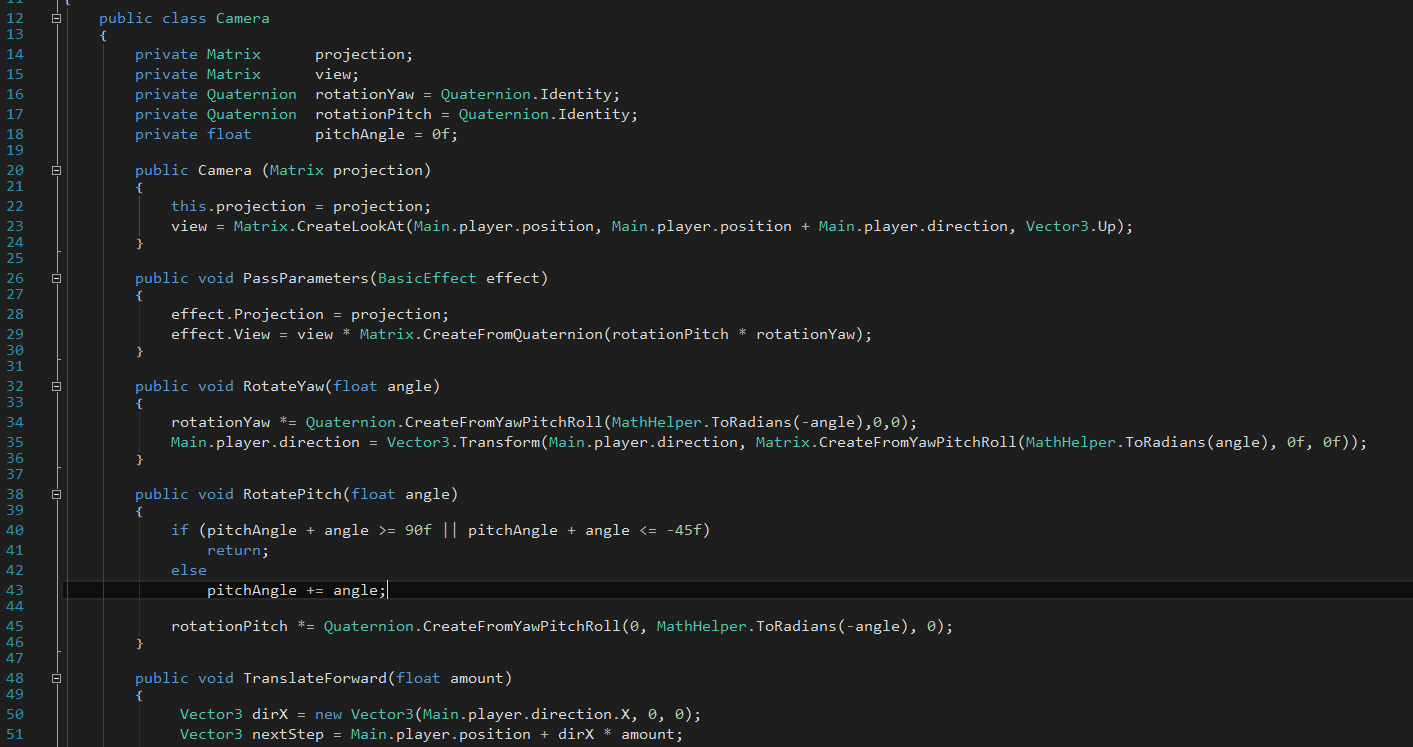
The above image shows my (probably wrong) camera class. But it works. Essentially I store to two rotations for looking up-down and left-right in seperate quaternions (lines 16-17).

When the player wants to rotate in particular direction, this is simply added to the relevent quaternion representing an axis, using the functions on lines 32 and 38.

Multiplying two quaternions essentially adds the rotations together. What this means is that when before passing the camera matrix to the shader, you simply create a rotation matrix from the two quaternions multiplied together (line 29). You then multiply your view matrix by the rotation matrix and voila.

The pitch angle (up-down) is stored to limit the rotation from going too far either above or below.

Monogame - Content Pipeline (Sound effects)

The content pipeline is very easy to use and so this is not a difficult thing to do, but still it did trip me up a little

I was trying to added sound an didn’t think the format was supported. I thought I had to use a .fx format but in fact the just simply wasn’t the case.

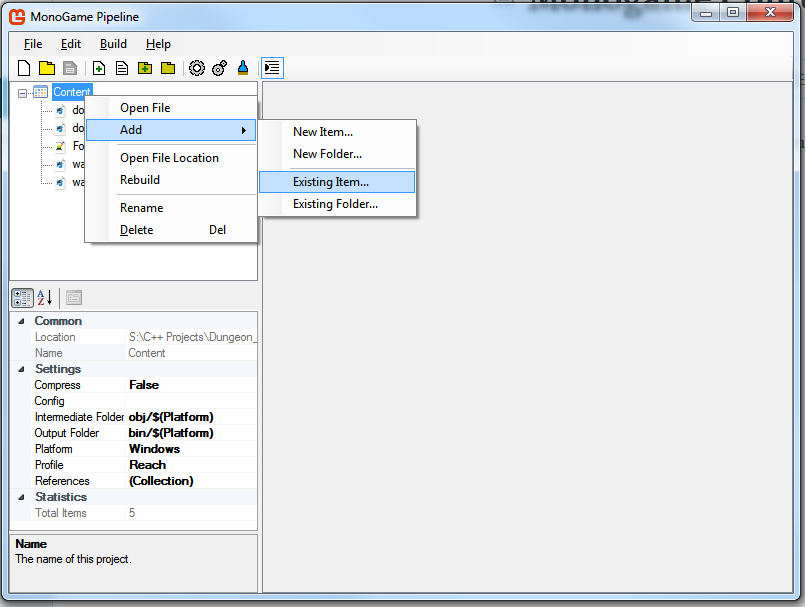
Open the Content manager, write click and add existing item:

.

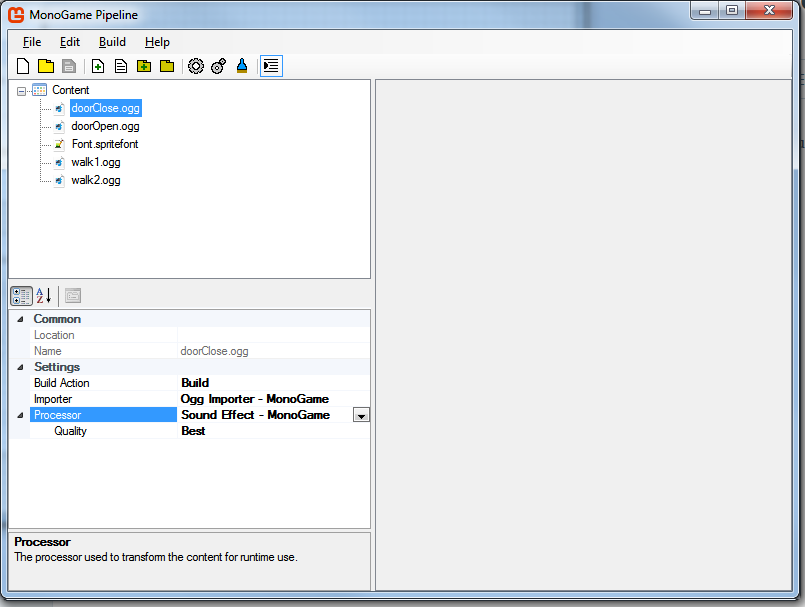
Once it is added, make sure to change the processor to sound effect, not song. I kept getting an error that it was of the wrong object type when importing in my code.

.

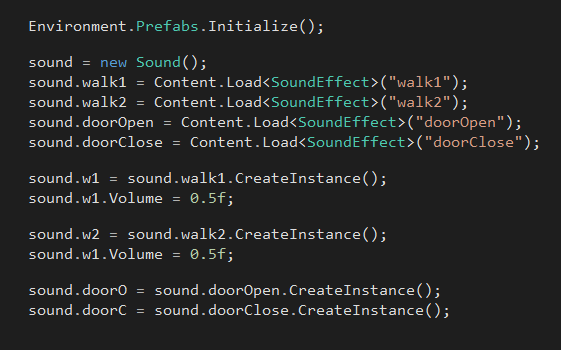
Then its simply a case of calling the Content.Load:

.

Essentially make sure that the and string name is the same as in the content manager and it should all work no problems. With SoundEffects, to use them you should really make an instance of them using the built-in CreateInstance() function. This is also how you can manipulate an individual sound effect’s volume etc.

Monogame - Rendering 3D with alpha blending and multiple render targets

Whilst creating my 3D dungeon crawler I came into a few issues. These were all nothing to do with Monogame itself. It is a fantastic framework. The issues were with how to order my drawing calls and render to multiple RenderTargets.

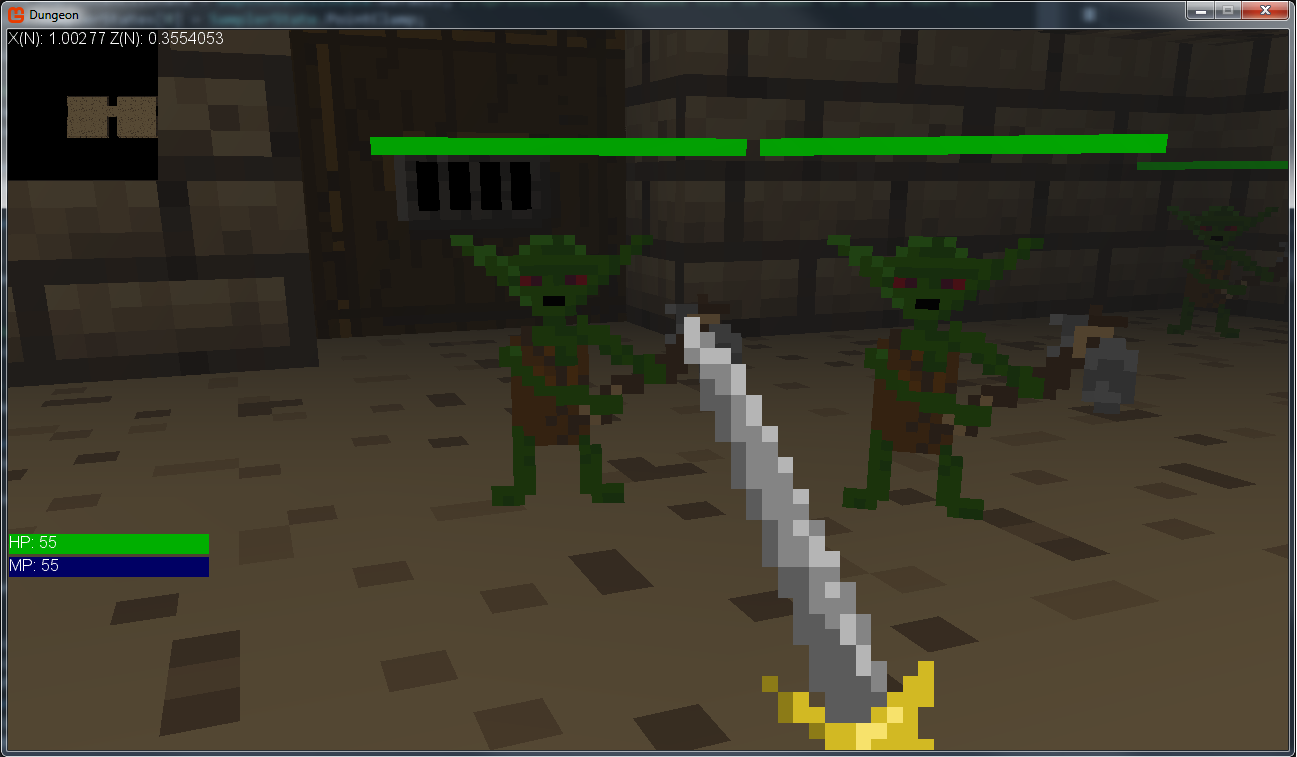
.

The above image shows my incredibly basic 3d dungeon crawler. I wanted to have a map (top-left) and I didn’t want to have to create extra graphics. So I decided to use another render target using another camera.

To do this I needed another RenderTarget2D (essentially a framebuffer) and draw the view from an camera overhead. There were a few things, though, that needed to be considerered:

  1. When you switch render targets, monogame will clear it without clear having to be called. What this means, is that all drawing done previously is wiped.
  2. Setting the rendertarget to null means that the default backbuffer will be set.
  3. Any rasterizer states or stencil states will be preserved

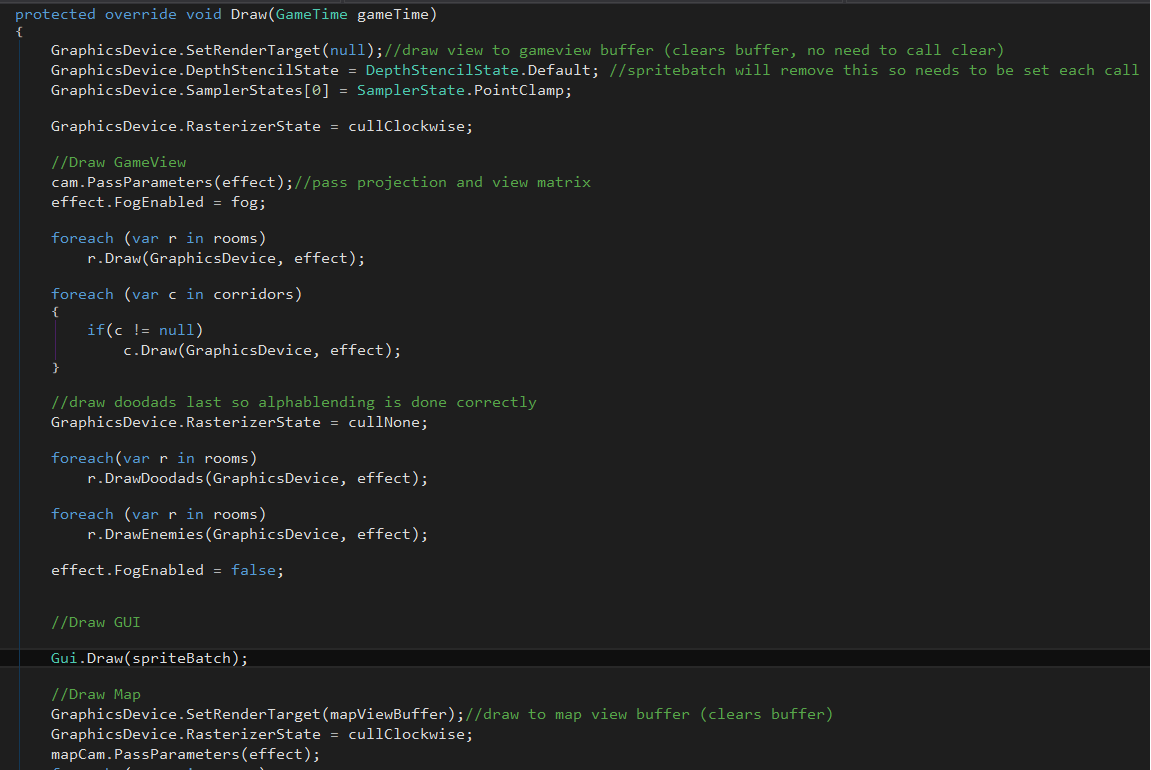
Another issue I had was with this was drawing the GUI using SpriteBatch. What wasn’t plainly clear is that the SpriteBatch will change the DepthStencilState of the current GraphicsDevice. What this mean was, I would draw in 3D and then notice that my geometry wasn’t being clipped or draw in the correct order (depth buffering). Objects that should have been behind were being drawn in front. To get around this, simply reset the DepthStencilState before drawing 3D geometry.

.

The image above demonstrates how to avoid the issues discussed. The final thing to watch out for is Alphablending. Make sure to draw objects with alpha channels last if possible else, those areas will be drawn over.

.

I decided for ease of development that my enemies would be sprites. They are drawn no problems with no alphablending issues as they are drawn last. The door behind though was drawn before the next room and so shows black between the bars instead of a clear view to the next room.